Instructions
Table of Contents
- The ZIP Contents
- Using Web Fonts in Static HTML
- Using in WordPress
- Using in WordPress and Oxygen or Bricks Builder with Code Snippet "MA Custom Fonts"
The ZIP Contents
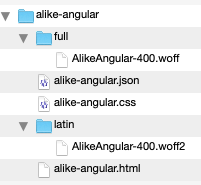
If you download a font with Web Font Loader it provides you with a ZIP file. The contents of this ZIP file look something like this:
 There's the main folder, named like the font in lowercase and hyphenated.
For the font "Alike Angular" this would be named "alike-angular".
The .json file contains structured information about the font details like available formats,
styles, weights, character sets, version, copyright and license information.
This file is used by the WordPress Code Snippet "Integrate Custom Fonts into Oxygen" (see
below).
The .css file contains all necessary CSS information to reference the font with all its formats,
styles, weights, character sets on your website.
There's a .html file which you can open in your browser to see a preview of that specific
font.
And finally, you will find several sub folders that contain the actual font files in the formats
WOFF and WOFF2 for all available character sets.
Those folders are usually named "full" (for the WOFF files) and something like "latin", "latin-ext", "greek" ... (for
the WOFF2 files). Don't be surprised if you find sub folders named like [2], [3], [4] ... here. This is how the
Google servers deliver some of the more specific character sets for WOFF2 font files.
Using Web Fonts in Static HTML
Upload to your server
Extract the ZIP file and upload all the contents to your website by FTP to use the web font, e.g. to a folder named
webfonts.
Include Web Font CSS
In your CSS file you simply import the CSS file provided with the downloaded web font:
@import '[path-to-your-font-folder]/[your-font-name].css';
For example, if you uploaded the contents of the ZIP file to a folder named webfonts, it would
be:
@import 'webfonts/roboto/roboto.css';

		@import 'webfonts/open-sans/open-sans.css';
Assign Web Font to Elements
To assign this web font to elements you would have to write your CSS like that:
h1, h2, h3 {font-family: 'Roboto';}

			p {font-family: 'Open Sans';}
Please note:
Folder and file names are lower-case and hyphenated, e.g. "open-sans".
Font family names are spelled with upper/lower-case and spaces, e.g. "Open Sans".
Using in WordPress
Upload to your server
Extract the ZIP file and upload all the contents to your website by FTP to the WordPress folder
wp-content/uploads/fonts/.
You might have to create the fonts folder first.
Customize CSS
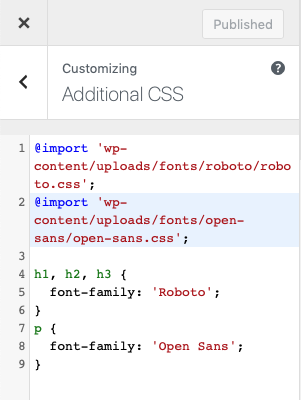
 In WordPress goto Appearance > Customize > Additional CSS.
Add the import statements for your fonts, e.g.
@import 'wp-content/uploads/fonts/roboto/roboto.css';

		@import 'wp-content/uploads/fonts/open-sans/open-sans.css';
Assign the web fonts to elements by writing CSS like that:
h1, h2, h3 {font-family: 'Roboto';}

			p {font-family: 'Open Sans';}
Your Additional CSS should look similar to this.
Please note:
Folder and file names are lower-case and hyphenated, e.g. "open-sans".
Font family names are spelled with upper/lower-case and spaces, e.g. "Open Sans".
Using in WordPress and Oxygen or Bricks Builder with Code Snippet "MA Custom Fonts"
Upload to your server
Extract the ZIP file and upload the extracted folder (named like your font) and all of its contents to your website by FTP to the WordPress folder
wp-content/uploads/fonts/.
You might have to create the fonts folder first.
That's it.
The snippet will automatically detect the web fonts and make them available within Oxygen or Bricks Builder.
Please be sure to disable
Oxygen's Google Fonts support by checking Oxygen > Settings > Bloat Eliminator > Disable Google Fonts.
Bricks' Google Fonts support by checking Bricks > Settings > Performance > Disable Google Fonts.
